To perform the migration process, first, we need to be in an environment where we can connect to both clouds at an admin level. Additionally, considering that the disks and volumes in our cloud to be migrated are on NFS, the environment should also be able to mount these NFS points. Let's proceed step by step by installing the necessary Python packages and configuring the settings.
1- OpenStack Cli and SDK
Let's install the openstackclient to test our connection and potentially run some commands in the future. Additionally, we'll install the openstacksdk to execute the necessary code snippets.
pip3 install python-openstackclient
pip3 install openstacksdk
Afterwards, let's take a look at their versions.
pip3 list | grep openstack
Next, let's create our clouds.yaml file in the path /etc/openstack/clouds.yaml and check it using OpenStack CLI commands.
clouds:
  oldstack:
    auth:
      auth_url: http://172.16.0.10:5000
      project_domain_name: Default
      user_domain_name: Default
      project_name: admin
      username: admin
      password: YOURoldstackPASSWORD
    region_name: RegionOne
  newstack:
    auth:
      auth_url: http://172.16.0.11:5000
      project_domain_name: Default
      user_domain_name: Default
      project_name: admin
      username: admin
      password: YOURnewstackPASSWORD
    region_name: RegionOne
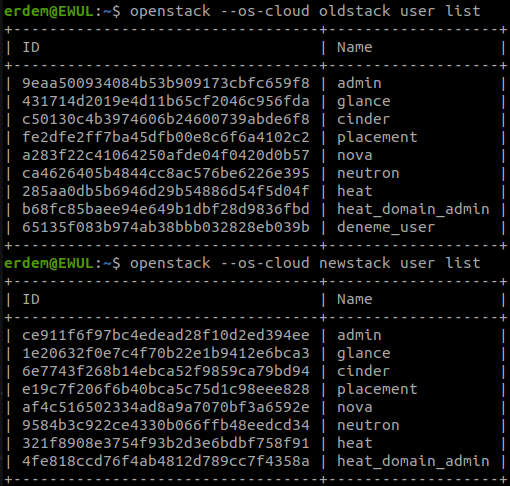
If you have also created the clouds.yaml file, you can proceed to test by listing the users for both clouds using OpenStack CLI commands.

As evident from the output, the OpenStack CLI is functioning, and we even have the user we'll migrate on the oldstack. Let's perform the same test using openstacksdk.
import pprint
import openstack

# Initialize PP and turn on OpenStack debug logging
pp = pprint.PrettyPrinter(indent=4)
openstack.enable_logging(debug=False)

# Initialize connection
connold = openstack.connect(cloud='oldstack')
connnew = openstack.connect(cloud='newstack')

print("---------- oldstack ----------")
for user in connold.identity.users():
    pp.pprint(user['name'])

print("---------- newstack ----------")
for user in connnew.identity.users():
    pp.pprint(user['name'])
When we run the script above using Python, the result we obtained is:
---------- oldstack ----------
'admin'
'glance'
'cinder'
'placement'
'nova'
'neutron'
'heat'
'heat_domain_admin'
'deneme_user'
---------- newstack ----------
'admin'
'glance'
'cinder'
'placement'
'nova'
'neutron'
'heat'
'heat_domain_admin'
If you haven't created the clouds.yaml file in the necessary location, you can also create it in the directory where this script is running, and you can use the SDK in this way as well.
2- Ramdisk
The question of why we need a ramdisk might arise. In short, during the migration process, it might not be possible to directly migrate certain VMs in their current state. We will need to take snapshots of these VMs and launch them from those snapshot images. Additionally, some VMs might be created from images uploaded by users rather than the images provided by our OpenStack installation. We will need to download all these images and snapshots from the oldstack's Glance and upload them to the newstack.
If we perform these operations directly on our regular hard disk, it would not only be slow but also unnecessarily wear out the disk. Consequently, to facilitate the migration, we will create a ramdisk on the migration system that is larger than the largest image file we intend to migrate from the old stack. This ramdisk will be used for these image transfer operations, avoiding the slowdown and potential wear on the physical disk.
First, let's check if we have enough available RAM on our system.
free -hThe output for my personal computer is as follows:

From what we can see here, we can comfortably allocate a 20GB ramdisk. Let's proceed by creating a directory for the ramdisk and granting all necessary and permissions to that directory.
sudo mkdir /tmp/ramdisk
sudo chmod 777 /tmp/ramdisk
sudo mount -t tmpfs -o size=20G mytemporaryramdisk /tmp/ramdisk
If we check our ramdisk:

Our ramdisk seems to be in place. Now, if we create a 10GB file, will it actually consume the available RAM capacity?

As expected, our available RAM has decreased from 26GB to 16GB after creating the 10GB file. This confirms that our ramdisk is functioning. Let's complete the ramdisk process by deleting the 10GB file we created.
rm /tmp/ramdisk/deneme.file You can remove the ramdisk using the command sudo umount /tmp/ramdisk. The directory we created will remain, but the ramdisk will be removed, meaning we will lose the files inside it. Because of this, it's a good idea for devices using ramdisks to have a backup power source, so they can continue working without experiencing data loss in case of a power outage.
3- NFS Mount
For the device where we'll be performing these operations, it needs to be able to connect to the paths where the Cinder and Nova services are located, similar to OpenStack installations. Therefore, let's establish the necessary NFS connections as well.
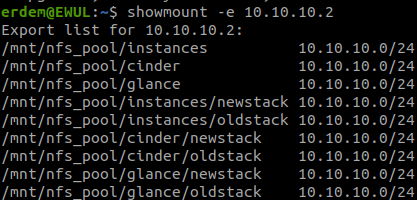
sudo apt -y install nfs-commonNext, let's take a look at the export paths on the NFS server.
showmount -e 10.10.10.2
Let's create the necessary paths in our environment and then proceed to mount them:
sudo mkdir -p /mnt/instances
sudo mkdir -p /mnt/cinder
sudo mount 10.10.10.2:/mnt/nfs_pool/instances /mnt/instances
sudo mount 10.10.10.2:/mnt/nfs_pool/cinder /mnt/cinder
Let's check:

Thats all about the preparation, now we can proceed to User Migration stage.
OpenStack to OpenStack Migration:
- Article Series
- Deployment Info
- Preparation
- User Migration
- Project Migration
- Flavor Migration
- Security Migration
- Network Migration
- TBC
Thanks: